![[Plain photo]](graphics/769Proj1.jpg)
![[Photo with notes]](graphics/769Proj1a.jpg)
![[Plain photo]](graphics/769Proj4.jpg)
![[Photo with notes]](graphics/769Proj4a.jpg)
![[Plain photo]](graphics/769Proj5.jpg)
![[Photo with notes]](graphics/769Proj5a.jpg)


|
|
Building a more accurate C&O wood caboose
from Gloor Craft’s kit
Like most other railroads, the C&O rostered a large number of wood-sheathed, center-cupola cabooses. Most were built in the mid- to late 1920’s and many lasted well into the 1970’s. As a matter of fact, the book Chesapeake and Ohio Color Guide to Freight and Passenger Equipment by David Hickcox shows 90751 wearing a fresh coat of yellow paint and an ACI label in 1971! Most of the C&O’s wooden cabs, however, were pretty beat up by then. I chose to model 90769 as photos of it appeared in the December 1972 Model Railroader. The C&O’s series 90700-90799 were built by Standard Steel Car Company of Butler, Pennsylvania in 1924. They were delivered in the then standard paint scheme of red with a black roof. They were repainted into the yellow scheme in the 1950’s, but at least one unit, 90762, was still in red paint in 1975.
I’ve learned a great deal since I completed this project. One of the things that I’ve learned is that the Gloor Craft model doesn’t really match the 907xx cabooses. They had windows in the center of the end walls of the cupolas which are missing from the Gloor Craft model. The Gloor Craft caboose is a much better match to the 908xx and 909xx cabooses. If I ever decide to redo this caboose, I’ll renumber it.
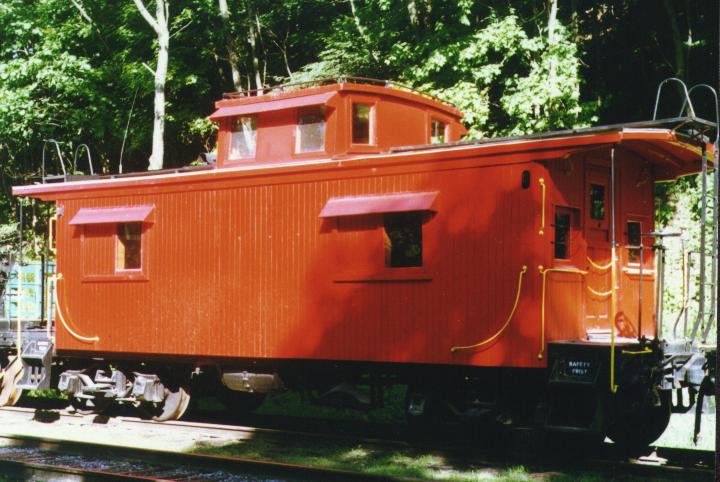 |
| Figure 1. This former C&O cab is now owned by the Cass Scenic Railroad in West Virginia. It differs from the 907xx series cabs in that it has end windows. (1997 photo) |
Gloor Craft’s kit consists of several pre-cut wood parts, some color-coded strip wood, a handful of soft metal castings, and some horrible green-painted wire. The kit also includes a large sheet of instructions (with several drawings) and white decal lettering for the red, steam-era paint scheme. With time and patience it will build into a fairly decent representation of the C&O cabs, but a little work and some replacement parts will result in a much better looking model.
| Gloor Craft Models #3106 C&O Caboose |
| Evergreen #2037 Car Siding |
| .010x.060 strip styrene |
| .011x.033 strip styrene |
| .015x.080 strip styrene |
| .022x.022 strip styrene |
| .012 brass wire |
| Custom Finishing #179 Marker Light Brackets |
| Detail Associates #6503 Curved Caboose Grab Irons |
| Detail Associates #6504 L-shaped Caboose Grab Irons |
| Detail Associates #2206 Eye Bolts |
| Detail Associates #2528 .015x.042 Flat Brass Wire |
| Detail Associates #6206 Air Hoses |
| Tichy #3013 Brake Gear |
| Kadee #5 couplers* |
| Champ Decals set #HC-247 |
*I’d now use Kadee #58’s
First, Vonne D. Linse’s photos and drawings in the December 1972 Model Railroader were invaluable. David Hickcox’s book Chesapeake and Ohio Color Guide to Freight and Passenger Equipment was also extremely useful for color and weathering information.
This is Step 1 in the Gloor Craft instructions. Seal all the wood you intend to use with sanding sealer (I used Scalecoat). Use two coats on each piece. Use 00 steel wool to lightly sand between coats and after the second coat. I don’t want to impugn Gloor Craft; it may be that my kit sat too long on someone’s shelf before I bought it or maybe the humidity in my basement was the cause. In any case, the siding in my kit disintegrated as I was smoothing the first coat of sanding sealer with steel wool. As a result, I used only the inner floor and floor, the corner braces, the inner and outer roof pieces, the scribed end platforms, and the bolsters, centersill, and ribs. I also used some of the strip wood. Everything else was replaced with styrene.
I built the core of the car following Gloor Craft’s instructions. Glue the inner floor to the floor. I used Weldbond for all wood-to-wood joints. The inner floor should be centered on the floor. The next step is to assemble the ends, but first I discarded the siding that came with the kit (see above). I substituted Evergreen’s #2037 Car Siding. Because the siding is only .020" thick, I laminated it with some scrap sheet stock I had on hand to match the thickness of the original wood. Cut the door openings in the ends. Cut the openings undersize and sand and file them to final size. I used CA to join the white metal doors to the styrene and to join the styrene ends to the inner floor. Next add the corner braces.
Glue the inner roof and center braces into place. Let these joints dry completely. When dry, sand the ends to match the contour of the roof.
Next, prepare the sides. Cut the openings for the windows (again, start undersize and file to final size). Measure carefully from the drawings; the window openings are the same distance apart on each side, but they’re closer to one end than the other. Do not cut the openings to match the Gloor Craft window castings; those parts are generic to several Gloor Craft kits and we’re going to build more accurate ones. Use CA to attach the sides and let them set up really well. Then sand the tops to match the roof contour. That completes the basic body.
Glue the roof to the inner roof. Make sure to leave equal amounts of overhang on both ends and both sides. CA the cupola castings together. I held some fine sandpaper on the roof of the cab and used that to sand the bottom of the cupola for a better fit. CA the cupola in place, but don’t make the same mistake I did: the C&O might call these center-cupola cabooses, but the cupola is certainly not centered. Check the drawings and measure carefully before you glue it in place.
Use the provided .020x1/32 stripwood to form the side facing strips under the roof. Shape the metal end strips, file them to length, and CA them in place between the ends of the facing strips.
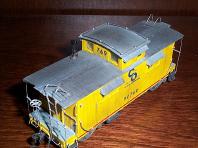 |
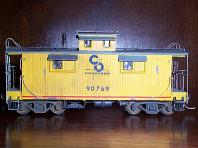
Figure 2. This is a shot of the
top of the finished car showing some of the additions and substitutions. |
Refer to Figures 2 and 3. We’re going to replace the scribed wood roofwalk with styrene. For each end of the car, cut 3 pieces .015x.080 styrene for the planks and 6 pieces of .022x.022 (HO scale 2x2) styrene for the supports. For each end, glue one of the supports next to the cupola and one at the end of the roof. Space the others equally in between. Glue the center plank in place first, then the two outer ones, leaving a very small amount of space between them. Cut another piece of .022x.022 and glue it up under the end of the roof walk to form the top of the roof walk end braces(see Figure 3). Use 2 pieces of .011x.033 styrene to form the diagonal supports. Repeat for the other end of the roof.
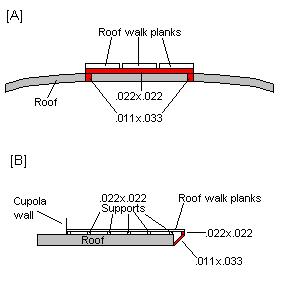 |
| Figure 3. Roof walk end brace details. |
Now, for each end of the car cut 5 pieces of .010x.060 styrene for the roof end walk planks and 2 pieces of .022x.022 for the supports. Glue the supports into place and then the planks, again leaving a tiny bit of space between adjacent planks.
Paint the roof inside the cupola flat black. I replaced the precut wood cupola roof with scrap styrene. Then I formed the cupola grab iron from .012 brass wire and supported it with 8 Detail Associates eyebolts (refer to Figure 2). I used some spare awnings from the State Tool & Die C&O Caboose Conversion kit (intended for the P2K Cab) for the cupola awnings. You can do the same, you could use strip styrene, or you could use the wood parts. Your call.
Locate and drill a hole to mount the smoke jack. CA it in place and form the braces from the #30 wire provided in the kit. This completes the roof.
I framed the doors with .011x.033 strip styrene. I used the Detail Associates L-shaped Caboose End Grabs on each side of the door. Form the other grabs from .012 brass wire. Use NBW castings to simulate the fastenings.
The most involved part of the sides are the window frames, so let’s start there. Refer to Figure 4. Start by framing the window opening with 4 pieces of .011x.033. This frame, on the prototype, appears to slide in the outer frame to allow the window to open. The outer frame is formed with .011x.033 and .022x.022 strips as shown in the diagram. Once the window frames have dried, CA the awnings in place.
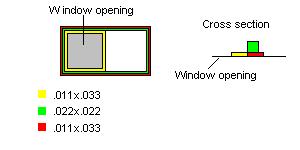 |
| Figure 4. Details of window frame construction. |
Refer to Figure 5 for the side details. Attach Detail Associates Curved Caboose Grabs at each corner and mount the Custom Finishing Marker Light brackets. The side details are now done.
 |
| Figure 5. This is a shot of the side
of the finished car showing some of the additions and substitutions. [Plain photo] [Photo with notes] |
The major compromise I made in building this kit was to use the Gloor Craft underframe. A comparison to drawings show that the parts are oversize. Still, part of me was getting tired of scratchbuilding by that point and, on the layout, it doesn’t show much anyway. Place the bolsters, centersill, and ribs according to the Gloor Craft drawings. Note that the ribs are not equally spaced between the bolsters. On the smokejack end of the car the rib is 6.5 scale feet from the bolster, on the other end it’s only 5 scale feet.
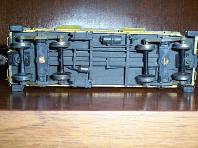 |
| Figure 6. This shot shows the
underbody details. [Plain photo] [Photo with notes] |
Follow Figure 6 for the correct location of the air line and brake components. Form the air line from the heavy wire provided in the kit. I used the air reservoir and triple valve from the Gloor Craft kit. The brake cylinder and other components came from the Tichy set. Follow the Tichy instructions and Figure 6 for the routing of the piping, which is made of .012 brass wire.
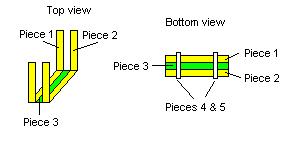 |
| Figure 7. Details of rerailing frog bracket construction. |
Form the brackets for the rerailing frogs from .015x.042 flat brass wire (See Figures 6 and 7). Bend 2 pieces into flattened U shapes (pieces 1 and 2 in Figure 7). Cut a third piece as long as the bottom of pieces 1 and 2. Pieces 4 and 5 are slightly longer than pieces 1,2, and 3 are wide, and bend up to form "ears" on either side of the bracket. CA the pieces together then CA them in place and install the frogs.
I used Kadee #5 couplers on this car. I first located the center line of the car and glued the top part of the #5 pocket in place (shave off the ears on either side of the box first). I then cut off the head and most of the rest of a Delrin screw (from another set of Kadee couplers) leaving just enough to go through the #5 pocket and fasten a nut. I used 5 minute epoxy to glue the screw into place in the top of the #5 pocket. When dry, put the bottom of the pocket in place (again sans ears) and fasten it with a 2/56 nut.
Install the end sill castings and the 1/32x3/32 strips under the sides of the end platforms. Form the end grabs and coupler cut bar from .012 brass wire and install. I used Detail Associates eye bolts to support the cut bar. Drill holes for the Detail Associates air hoses, but don’t install them yet.
Because I model 1970, I decided to paint my caboose in the C&O’s yellow caboose scheme. The photo of 90769 in the December 1972 Model Railroader showed that the car was in tough shape - the paint was very old and was peeling, faded, and stained. So, that’s the way I tried to do it.
I started by spraying a light coat of Testor’s medium gray over the whole car. I don’t think the exact shade of gray really matters as long as it’s not so dark as to appear black, or so light as to appear white. Go easy on the cupola walls; the scribing there is very fine and shallow and easy to fill in with paint. Let this coat dry for several days.
Now, using a straight pins, dab small amounts of rubber cement where ever you want the paint to peel. Try to keep the peeled areas fairly small. The photos I’ve seen don’t show large areas devoid of paint, even after 20 years. Let the rubber cement set for a little while, then spray the yellow. I used some Accuflex C&O Yellow that I had on hand. Testor’s Model Master FS33538 is a fairly close match (especially considering what we’re going to do to it). When the yellow is dry, carefully rub off the rubber cement.
I used Floquil’s SP Dark Lark Gray on the roof, cupola roof, the end platforms, and the window awnings. If you’re not modeling the 90769, check photos before painting the awnings. On the prototype, these seem to weather very differently from car to car; on some the awnings look gray, on others yellow, and on still others they fade to a sort of brownish yellow. The underbody got a coat of Floquil’s Grimy Black.
Paint the smoke jack, the marker light brackets, and all the grab irons with flat aluminum paint.
I used Champ Decals set #HC-247 to letter this car. The decaling is fairly straight forward with no special difficulties.
Ok, now let’s make this cab look like it’s been in hard service for years. Mix up a wash of thinner and Testors rubber paint. Apply this all over the car, flowing from the center to the sides on the roof and from top to bottom on the sides. This should tone down the yellow and gray and blend things together. Now, dip the very tip of a fine brush into the rubber, then load it up with thinner. Streak down the sides below each place where the paint has “peeled” to simulate the staining on the prototype cars. Set the car aside and let it dry for a couple of days.
I started the final end detailing by cleaning up the kit’s brass ladder stock with a file. Note that the sides of the ladder flare out a bit above the top rung. The railings at the top of the ladder were formed of .012 brass wire. To simulate the area where the prototype’s piping was flattened and bolted to the roof, I smashed the end of the wire between the jaws of a smooth-jawed vise. The remaining railings were all formed of .012 brass wire CA’d together (my soldering skills are somewhat under-developed). Mount the brakewheels on wire rods and CA them in place. Paint the railings, ladders, and brakewheels flat aluminum. Insert the Detail Associates air hoses in the previously drilled holes. Paint them flat black. Attach the steps to the end platforms. they should be black with aluminum edging. The end details are now complete.
I applied a light coat of brown chalk dust to the lower sides of the body and a mix of black and brown to the roof. A little rust and brown was dusted over the underbody. The smokejack was weathered by cutting a cardboard mask to protect the roof and cupola. I first lightly coated it with Accuflex's Milwaukee Road Brown (a nice old rust color). I then applied a coat of flat black over that. The end sills got a quick zap of grimy black. I then sprayed a light coat of Testors Dullcote over everything.
When the clear coat was dry, I installed the Kadee #5’s in their pockets and mounted a pair of caboose trucks scavenged from my parts box. I haven’t seen them, but Tichy #3051 trucks might be a good match. I replaced the wheelsets in my trucks with Kadees and polished the wheel treads. The final step was to glaze the windows using Micro Kristal Klear. C&O caboose 90769 was now ready for service.
![]() caboose.pdf
caboose.pdf
![]()
Use this link to download the article in PDF format. You must have
the free Adobe Acrobat reader installed to use this file. If you do not have the
Acrobat reader, you can get it by clicking the “Get Acrobat Reader” icon
above. To download the article, right click the link and select
“Save Target As” from the menu.
Stations |
|
You are visitor number
to this site since the new counter was inaugurated on June 28, 2004.
This site was originally established in 1997.
| Mail comments to: | Larry Z. Daily |
Please note that, due to a huge volume of spam coming in on my email account, I’ve had to change my email address. The new address is lzdaily@nospam.piedmontsub.com (but remove the nospam and the dot before piedmontsub.com).
Copyright © 1997-2025 Larry Z. Daily. All rights reserved.
All materials on this Web site are protected by United States
copyright law. This includes, but is not limited to, articles and graphics. Unless
otherwise indicated, these materials are the property of Larry Z. Daily and may not
be used without prior written permission of Larry Z. Daily