

|
|
Building a C&O 70-ton quad hopper
from Athearn’s kit
The C&O had 2 series of quad hoppers, cars 68000-69576 and 71500-72999. These hoppers were originally built between 1928 and 1930 and were rebuilt by the C&O’s Raceland Car Shops in 1946. Many were still in service in 1970, so I decided to add a few to my fleet. There’s a photo of 71904 in David Hickcox’s book Chesapeake and Ohio Color Guide to Freight and Passenger Equipment. The photo is dated 1968, which is close enough to 1970 for my standards.
The starting point for this project is Athearn’s Blue Box quad hopper. These aren’t still in production, but you should be able to find them at train shows. The Athearn car is a pretty good match to the C&O cars; as near as I can tell the principle dimensions are right on. There are, however, several detail differences and our goal is to correct those. I’ll warn you before we start: I’ve never counted rivets, not even when I was bored, so this car isn’t going to be a perfect replica of the C&O cars. It will, though, look a lot more like the C&O’s quad hoppers.
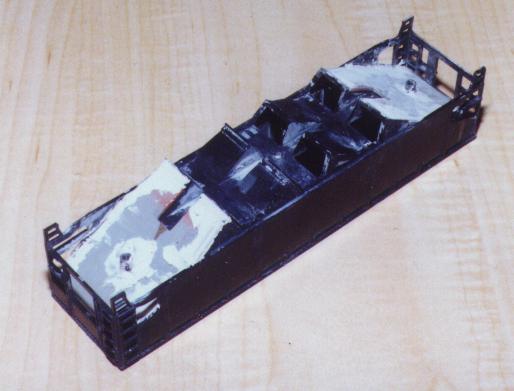
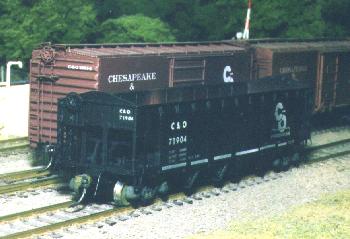
I had several of the Athearn cars done up in Athearn’s Western Maryland paint. Mine dated back to my pre-prototype days and were very poorly weathered. In addition, the cars as they came from Athearn didn’t have a number and I just added one with decals that I had on hand. One of these cars is shown in Figure 1. All in all it’s a pretty sorry mess, but there’s gold under that heavy-handed paint. Let’s go find it.
 |
| Figure 1. Before shot of a poorly weathered stock Athearn car. |
| Athearn quad hopper - undecorated preferred |
| Westerfield Hopper Car Details #2190 |
| Tichy #3013 AB style brake gear |
| Detail Associates #6415 Stirrup Steps |
| Detail Associates #6215 Coupler Cut Bars |
| Detail Associates #6206 Freight Car Air Hoses |
| .040 sheet styrene |
| .010 x .060 strip styrene |
| .011 x .033 strip styrene |
| .040 x .040 strip styrene |
| .012 brass wire |
I received the November 1998 Mainline Modeler after I completed this project. It includes drawings of this car that I wish I’d had when I started. You may want to get a copy before you begin.
Hickcox, David H. (1998). Chesapeake and Ohio Color Guide to Freight and Passenger Equipment. Scotch Plains, NJ: Morning Sun Books, Inc.
Kresse, Al Jr. (1996). Chesapeake and Ohio Freight Cars 1937-1965, Volume 1: Hopper and Gondola Cars. Clifton Forge, VA: Chesapeake and Ohio Historical Society.
Let’s start with the frame. Refer to Figure 2 (click on the drawing for a bigger version). Remove the sides and center post of the Athearn coupler pockets (the red areas in the drawing). Sand the area smooth. Glue the top of a Kadee #5 coupler pocket to the pad, let it dry, then drill and tap for a 2-56 screw. Remove the mounting lugs for the Athearn brake gear. Fill the big gap (shaded gray in the drawing) with .040 styrene. Set the frame aside.
 |
| Figure 2. Frame modifications. |
1. If your model isn’t undecorated, remove the paint. I used Polly S Easy Lift Off. Some people recommend automotive brake fluid, but I’m not sure I agree. The right tool for the right job, and that sort of thing.
2. Glue the Athearn weights in place. Remove the long plastic column that the truck screw goes into. Putty the gaps around the weights and, when dry, sand smooth. See Figure 3.
 |
| Figure 3. The Athearn weights in place. |
3. Get out your modeler’s knife and several fresh blades. Remove the cast on grab irons, ladder rungs, the stirrup steps, and the end supports. Figure 4 shows one end of the car with all the Athearn details removed. Spare as many rivets as you can, along with your fingers.
 |
| Figure 4. One end of the car prepared for detailing. |
4. Glue the Athearn brake wheel in place to fill the hole. Let it dry, then carve off the hand brake details.
5. There was a small “lip” of plastic all around the top edge of my car. It will interfere with installing the end peaks later, so lightly sand it off now.
6. Install the underframe and hopper doors. I used styrene cement in addition to the screw Athearn provides.
The next few steps apply to both ends of the car.
7. The center uprights (I’m not sure what they’re really called) on the C&O cars are channels. The one’s on the Athearn car are simple angles - that’s why we took them off. Build new ones from one piece of .011 x .060 styrene for the back and 2 pieces of .011 x .033 (trimmed to be just a little wider than the thickness of the back) for the sides (See Figure 5). These supports are a scale 5' long. Make four - two for each end. Glue them in place a scale 3' from the sides.
 |
| Figure 5. Details of the end support construction. |
8. Add slope sheet braces from the Westerfield kit.
9. Form the end grab irons and ladder rungs from .012 brass wire. The top rung of each ladder is straight, the rest are drop grabs. I used the bolt details on the Athearn ladders to space my rungs, but it turns out that they’re a bit too close to the bottom. If I were to do this project again, I’d shave them off and space the rungs according to the drawing in the C&O hopper car book. Form the support for the side grabs from .011 x .033 styrene and install the 2 side grabs.
10. Straighten a pair of Detail Associates coupler cut bars so that they go to the top of the couplers. Install using 2 eye bolts.
11. Add the diagonal frame members (see Figure 6) made of .015 x .080 styrene.
 |
| Figure 6. Frame and underbody details. |
12. Add the stirrup steps (see Figure 6). I didn’t have the right ones on hand, but I’ve listed the correct part in the parts list. I intend to change mine before I finish the car.
13. Near each stirrup step is a “towing ring” (see Figure 6). I made mine from the “ears” cut off the top of a Kadee #5 coupler box. I can’t take credit for this method, though. I discovered the method in an article by Jim Providenza in the April 1998 Railroad Model Craftsman.
14. Add the end peak extensions from the Westerfield kit. Add 2 braces made of .040 x .040 styrene strip at each end inside the car. A view of the A end of the car at this point is shown in Figure 7.
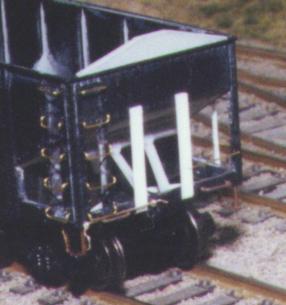 |
| Figure 7. The A end of the car with details installed. |
The next steps apply to the B end only.
15. Add the brake cylinder, the triple valve, and the air reservoir as shown in the instructions from the Tichy brake set. You can add the piping if you want - I didn’t. And, to be honest, I substituted a larger air reservoir from my scrap box because the Tichy item didn’t look as large as the ones in my photos.
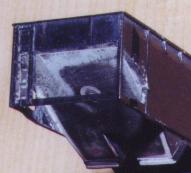
16. Mount the Tichy hand brake parts. I used the Tichy brake platform, but cut small triangles of styrene for supports, rather than use Tichy parts. Figure 8 is a photo of the B end at this point.
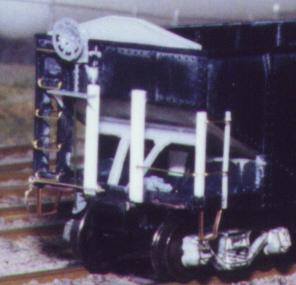 |
| Figure 8. The B end of the car with the details installed. |
17. I formed the air line from an old length of Athearn diesel hand rail wire. Facing the B end of the car, the line should run just under the car side on right side. I ACC’d Athearn hand rail stanchions at the support points on the air line, then cut off all but the ends to represent the air line brackets. ACC the air line in place, and the body modifications are done.
Painting is simple. Load up your airbrush with black and have at it. Some folks suggest lightening black with a little white, but I’m not one of those people. To decal my model, I used parts from several different sets. The large monogram, reporting marks, and road numbers came from a Champ #360 set. The data came from Champ #HD-5. The capacity data aren’t strictly correct for the C&O’s hoppers after rebuilding, but my eyes are getting bad enough that I didn’t want to try cutting apart all those tiny little numbers. The white visibility stripes were cut from some leftover Walthers numberboard decals. Don’t worry about getting them perfect - in the prototype photo I used it looked like the painters did the stripes by hand.
 |
| Figure 9. B end of the finished car. |
The prototype photo I followed showed the car 6 years after it had been rebuilt. It didn’t look too beat up, so I went easy on the weathering. I dusted the outside of the car with black chalk to tone down the white lettering (especially the visibility stripes). I shot the inside of the car with Floquil Red Oxide - hopper interiors take a real beating from their loads. I painted the truck sideframes and wheels with a mixture of Floquil Grimy Black, Rust, and Rail Brown. Then, using a mix of Rust and Rail Brown, I drybrushed the truck sideframes to bring out some of the detail. The wheels got a heavier coat of this mix. Then I dusted the truck sideframes with black chalk. I used a wire brush attachment in my moto-tool to polish the wheel treads and installed the Kadee wheelsets into the trucks. I’m of two minds on polishing wheel treads. On the one hand, if you’ve ever watched prototype cars rolling by, the shiny wheel treads are very noticeable. On the other hand, polishing HO wheel treads emphasizes how fat they are compared to the prototype. Tough call. In any case, drybrush the couplers of your choice with the Rust/Rail Brown mix and install them into the coupler pockets. Add the trucks and the Detail Associates air hoses. Put the car on the tracks and send it off for a load of West Virginia coal.
 |
| Figure 10. Side view of the finished car. |
![]() hopper.pdf
hopper.pdf
![]()
Use this link to download the article in PDF format. You must have
the free Adobe Acrobat reader installed to use this file. If you do not have the
Acrobat reader, you can get it by clicking the “Get Acrobat Reader” icon
above. To download the article, right click the link and select
“Save Target As” from the menu.
Stations |
|
You are visitor number
to this site since the new counter was inaugurated on June 28, 2004.
This site was originally established in 1997.
| Mail comments to: | Larry Z. Daily |
Please note that, due to a huge volume of spam coming in on my email account, I’ve had to change my email address. The new address is lzdaily@nospam.piedmontsub.com (but remove the nospam and the dot before piedmontsub.com).
Copyright © 1997-2025 Larry Z. Daily. All rights reserved.
All materials on this Web site are protected by United States
copyright law. This includes, but is not limited to, articles and graphics. Unless
otherwise indicated, these materials are the property of Larry Z. Daily and may not
be used without prior written permission of Larry Z. Daily